
Essential features support enquiries and site security. Analytics statistics run unless you switch them off; Clarity and advertising measurement need your permission. You can change these at any time.

Essential — always active

Remembers these preferences and supports the services you request, including form security.

Choices last up to six months on this browser. Withdrawing permission may refresh this page to stop previously loaded tracking.

ChesterProperty & GardenMaintenanceChester Property & Garden Maintenance

Accessibility options

Adjust the site to make it easier to read and use. Changes apply immediately and are saved on this browser.

You can also use your browser’s zoom controls.

CPAGM work gallery · Garden fence painting

A darker finish.
A more considered
garden boundary.

From red and brown timber to dark grey. Explore the fence, the house-side screen and the care around the decking — in twelve photographs from the job.

01 — The colour02 — The care03 — Your fence
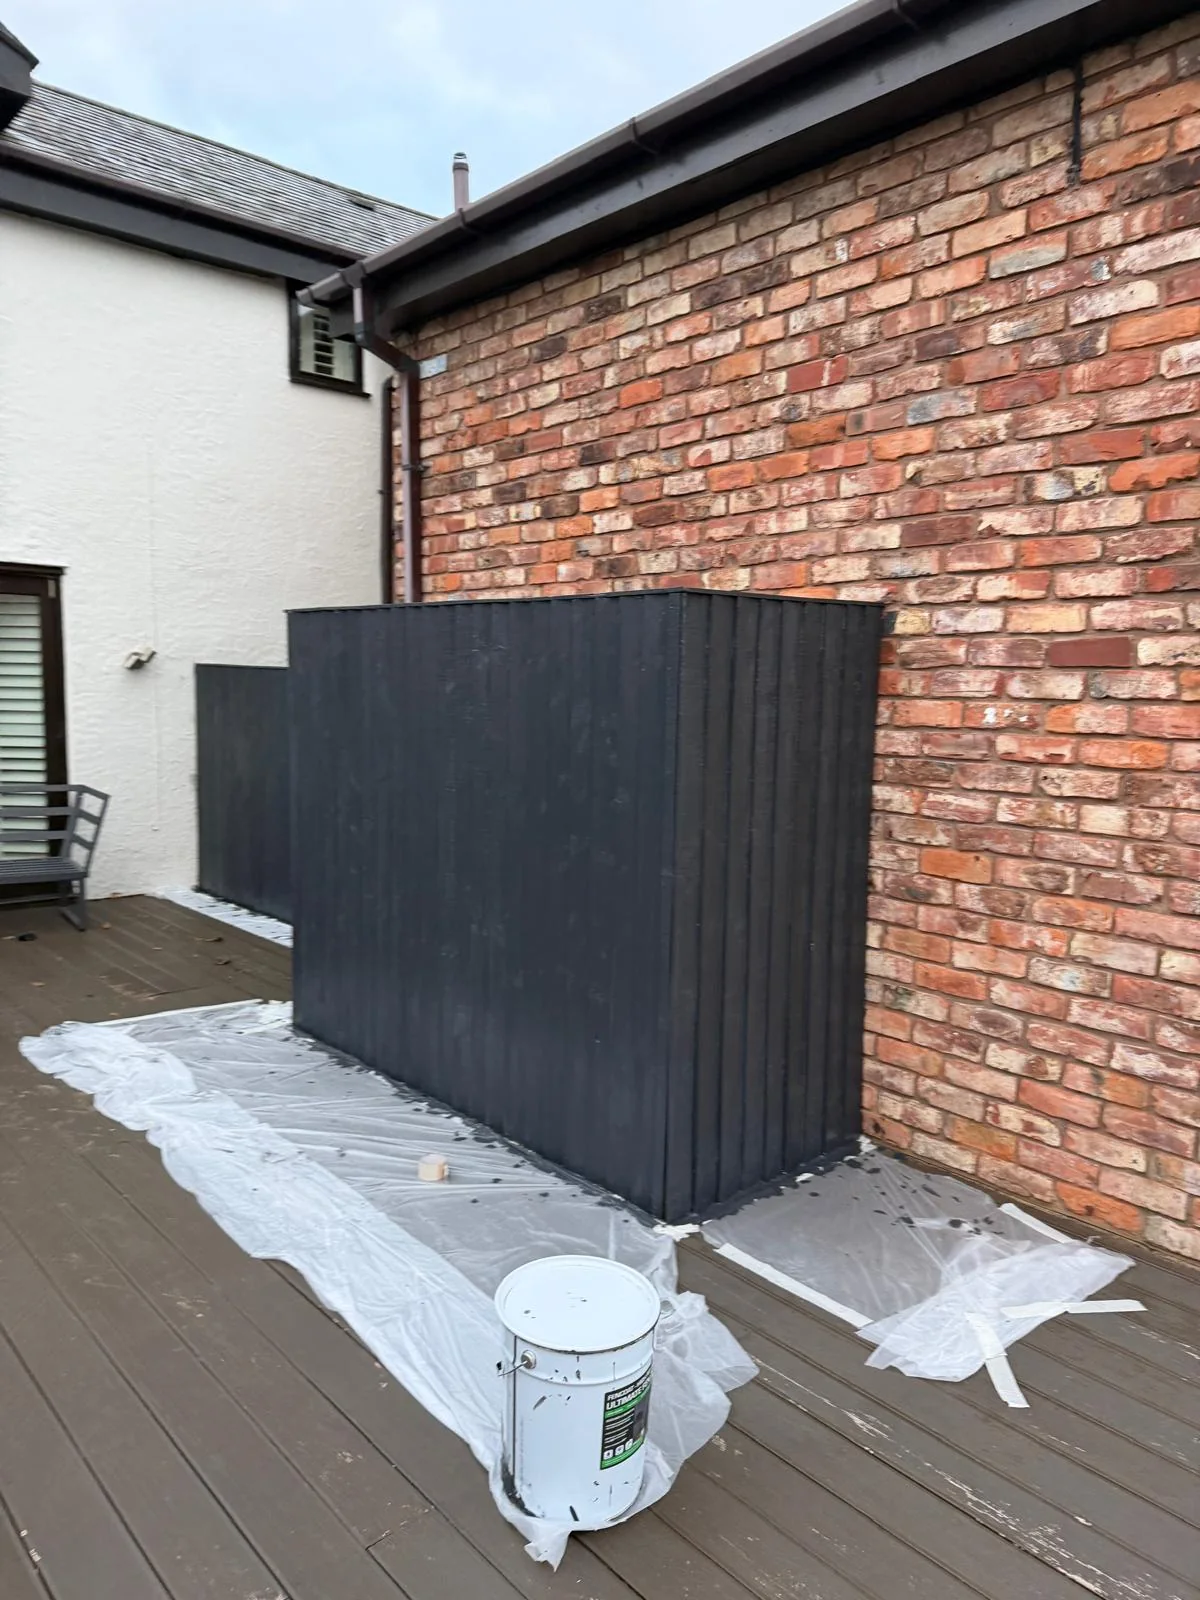
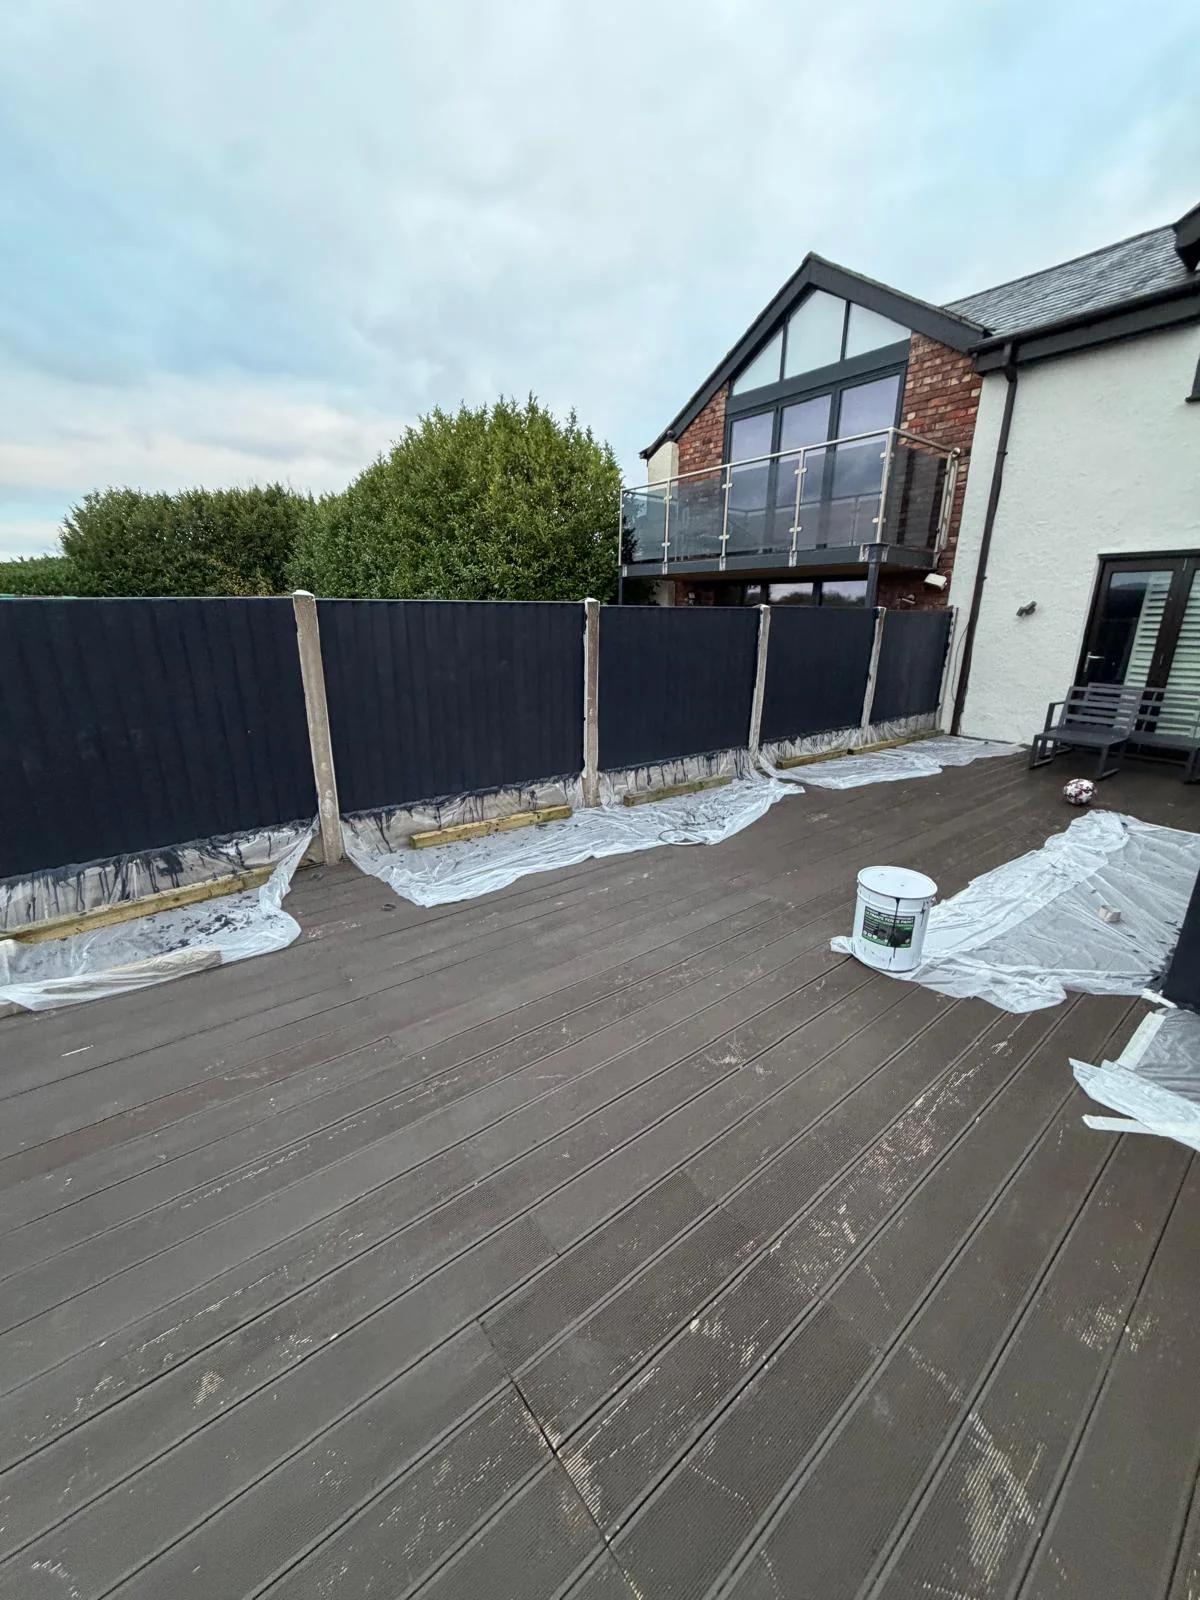
Dark grey timber screen beside brickwork with protective sheeting over the deckingDark grey fence panels beside decking, with concrete posts visible and protective sheeting below Coating stage
The screen beside the house. Coating-stage photograph; deck protection is still in place.
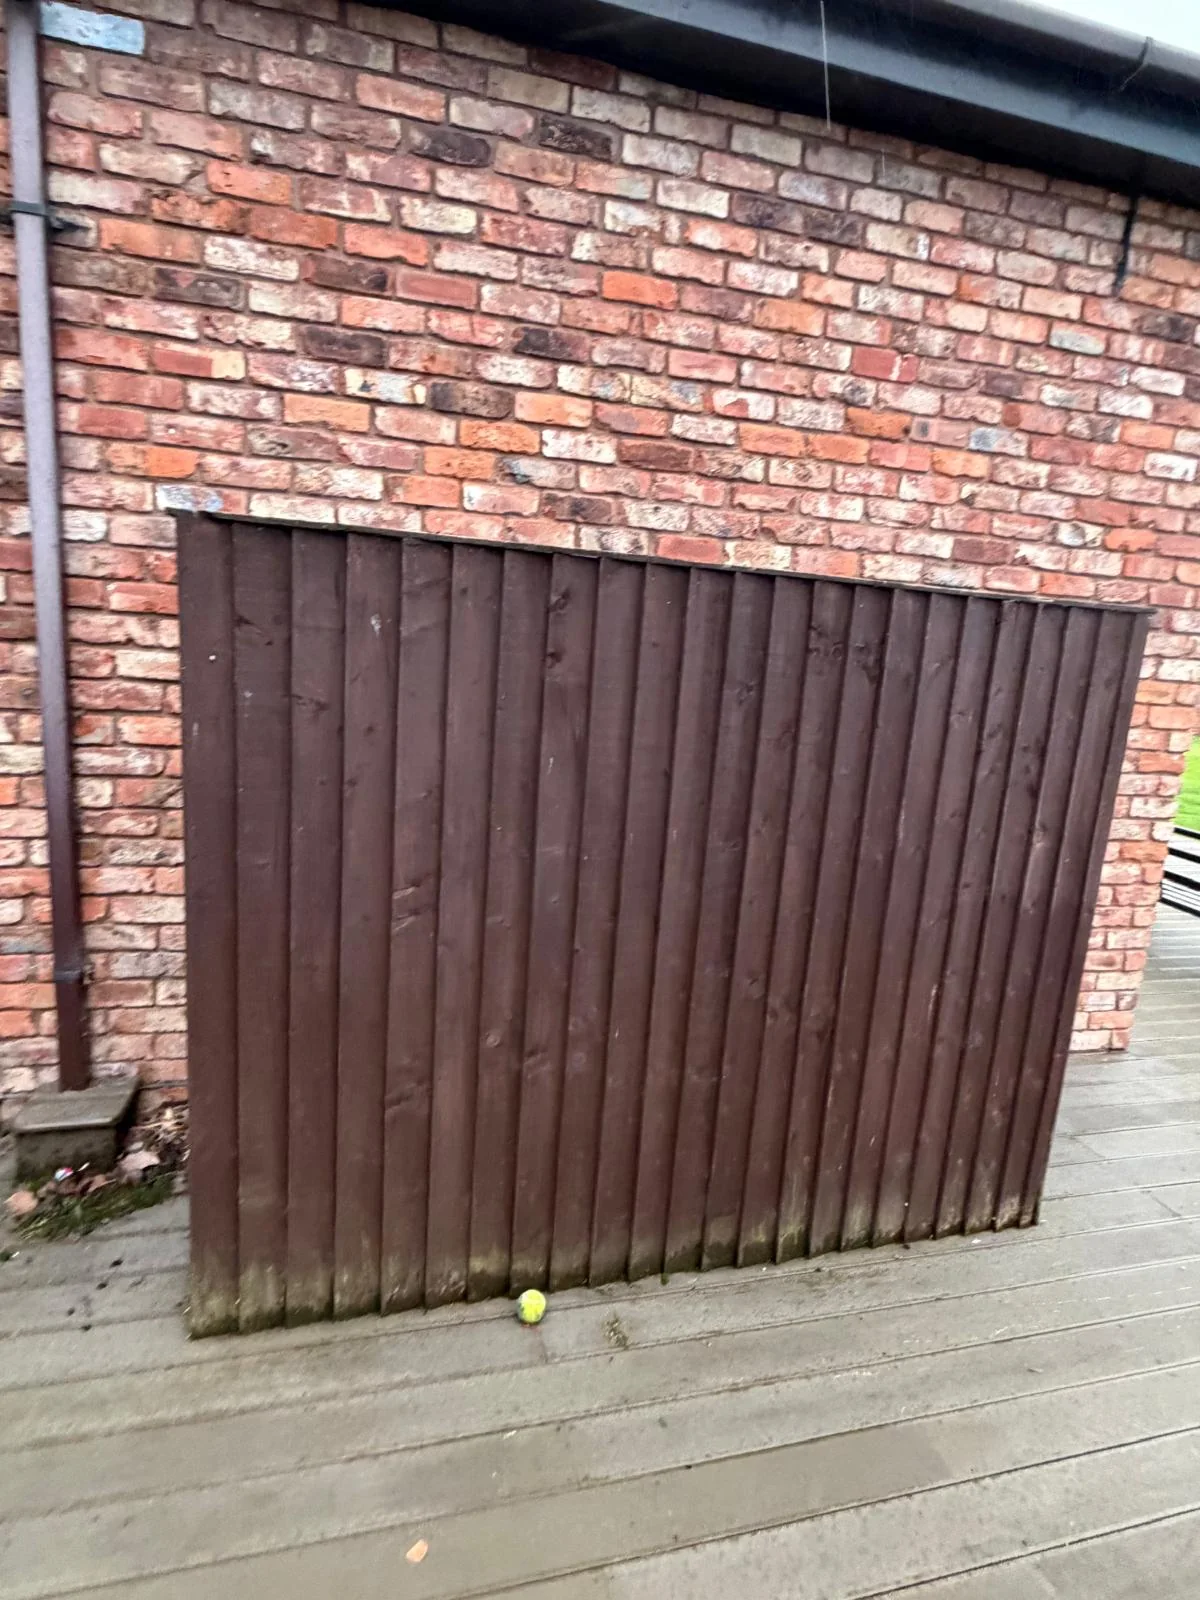
The same house-side timber screen in its original brown finish, before painting
Where it started

12 distinct photographs

5 before views

7 coating-stage views

What makes the difference?

The colour change

The same timber screen. A different colour.

Compare the original brown screen with the dark grey coating-stage view. These are different camera angles; protective sheets are still in place in the later photograph.

Before — brown timber
Brown vertical timber screen against a brick wall with green discolouration along its base
Coating stage — dark grey
Dark grey vertical timber screen beside a brick wall, with protective sheets over the surrounding decking

Project photo gallery

Follow the fence from the starting colour to the coating stage

Twelve original job photographs show the whole boundary and the closer details beside the house. Start with the red/brown panels, then explore the dark grey colour and the deck-side working areas. Tap any photograph to look more closely.

Job photographs
12
Before views
5
Coating-stage views
7

Swipe each row to browse. You can also focus a row and use the arrow keys. Tap a photo to enlarge it.

Before: the existing timber

Red/brown panels, mixed starting colours and the screen beside the house. 5 photographs.

Red brown timber boundary panels between concrete posts around a large lawn
Before — the red/brown boundary panels viewed across the lawn.
Red brown garden fence alongside timber decking and outdoor seating
Before — the red/brown fence continues beside the existing seating deck.
Mixed red brown and lighter timber fence panels with concrete posts and gravel boards
Before — red/brown and lighter timber panels along the same boundary.
Brown vertical timber screen against a brick wall with green discolouration along its base
Before — the brown timber screen, with green discolouration visible near the bottom.
Brown timber screen and gate beside house pipework with green discolouration near deck level
Before — the gate and screen beside the house, showing the lower boards and existing surface condition.

Coating stage: dark grey timber

The colour change across the garden, with protection and materials still visible. 7 photographs.

Dark grey vertical timber screen beside a brick wall, with protective sheets over the surrounding decking
Coating stage — dark grey timber screen beside the brick wall, with protective sheeting around its base.
Dark grey garden fence panels alongside decking with protective sheets below and visible concrete posts
Coating stage — the dark grey fence beside the deck, with sheets at the base and the concrete posts left visible.
Wide lawn view towards dark grey boundary fencing and decking with protective sheets still in place
Coating stage — a wide view puts the grey boundary and deck-side working area in context.
Dark grey timber fencing between light concrete posts around the far side of a lawn
Coating stage — the long boundary viewed from across the lawn, showing the change in panel colour.
Dark grey timber screen and garden fence along the deck beside a brick house
Coating stage — the grey screen and boundary seen along the deck beside the house.
End of a dark grey timber screen beside brickwork with protective sheeting on the deck
Coating stage — the end of the screen, with covering at the deck and wall junction.
Open dark grey timber gate and screen beside house pipework with protective sheets beneath
Coating stage — the gate stands open, showing the screen layout and the timber faces beside the house.

Planning a similar job?

Let’s look at your fence.

Send the full boundary, a few close-ups and your postcode. Tell us which faces, gates and screens you would like included.

Send fence photos

One garden. Several surfaces to think about.

The starting photographs show a long run of red/brown fence panels, with some lighter timber among them. Closer to the house, the screen and gate have a brown finish and green discolouration near their lower edges. Those close views matter: a fence can look straightforward from across the lawn while the base tells a different story.

The lawn, deck, brickwork, concrete posts and pipework all sit close to the timber. A good painting plan considers those junctions as well as the square metres of fencing. Here, the later photographs show dark grey timber with the existing layout retained.

From red/brown to a quieter dark grey.

Our team repainted the boundary panels and house-side timber screen in dark grey. Against the lighter concrete posts, the individual panel bays remain easy to read. Across the lawn, the colour gives the long boundary a more consistent appearance; beside the house, it brings the screen and gate into the same palette.

The gallery includes both whole-garden views and closer photographs of the screen. Different light and camera angles change how the shade appears, so use these images to judge the overall effect and discuss an actual colour sample before choosing your own finish.

The work around the fence matters too.

Protective sheets are visible on the decking beneath the panels and around the timber screen. At these edges, careful covering helps contain coating drips and splashes. The close photographs let you see the working area rather than only a distant view of the new colour.

Decking, masonry and concrete have different surfaces from the timber being painted. Protection needs to stay secure as the work progresses, especially around corners, gates and narrow gaps. The supplied photographs still show sheets and materials in place; they are a record of the coating stage.

Why bring in a professional for fence painting?

The value starts before the first coat. A professional can assess loose finishes, surface growth, vulnerable lower edges and the condition of the boards, then agree suitable preparation and a compatible exterior timber coating. Soft, damaged or unstable timber needs assessment and any necessary repair rather than simply being covered over.

Long panel runs also take planning: access to the faces being coated, protection of nearby surfaces, work around posts and gates, and enough suitable weather for the chosen product. Agreeing those details helps you understand what the price includes and what finish to expect. A new colour is only one part of a well-organised job.

Agree the preparation, coating and finish.

For your own project, ask for the preparation, product, colour and intended coverage to be written into the scope. The condition of the old finish and the coating manufacturer’s instructions should guide cleaning, drying and application. The photographs of this job do not establish an exact preparation method, number of coats or product specification.

Confirm whether the quote covers one face or both, gates and screens, and any separate repairs. Weather, timber dryness and drying intervals can affect the sequence. Our team confirms the practical scope and available dates before the work is booked.

Show us the whole boundary — and the details.

Send a wide photograph of each fence run, then closer views of the base, any flaky coating and damaged boards. Include gates, screens, planting and the route into the garden. Tell us which faces you want painted and whether nearby decking or paving needs particular care.

If you are deciding between repainting and repairs, we can discuss the visible condition and whether a visit is needed. You will receive a quote for the agreed work at your property; the size, access and preparation on this project are not a fixed-price promise for another garden.

Plan a similar job

Services connected to this project

The primary service for this project was Fence Repairs & Replacement. The links below cover that service and closely related options for planning a similar job.

From assessment to finish

How the work moved through each stage

Good results start with checking the condition, planning the work and finishing with a final quality check. These are the practical stages used for this job.

  1. 01The starting colours and condition
  2. 02The boundary colour change
  3. 03Care around the deck and brickwork
  4. 04Planning the right finish for your fence

Customer feedback

What customers say about our fence repairs

These customers describe separate work by the CPAGM team. Their reviews support the service shown here; they are not reviews of this photographed project.

“He was punctual, tidy, and did a great job cleaning and sealing our block-paved patio, plus fixing our gate. Would recommend CPAGM if you have any maintenance requirements.”

Natalie S.

Patio cleaning, sealing and gate repair · Google review excerpt

View on Google
Natalie S.'s feedback and related services
“will definitely use him again.”

Margaret H.

Gate repair · Google review excerpt

View on Google
Margaret H.'s feedback and related services

Feedback on gate repairs

Natalie and Margaret both mention a repaired gate. Their feedback supports gate-repair work; a replacement fence is a different scope. Send the damaged area, posts and access so our team can assess what is needed.

Read customer feedback and related work galleries

Before you book

Questions about this fence painting project

The right approach depends on the property, access and the result you need. These answers explain what to expect before our team confirms the scope and price.

Explore Fence Repairs & Replacement
What work do these photographs show?

They show garden fence painting and a timber screen and gate changing from red/brown to dark grey. Five unique photographs show the starting condition and seven show the later coating stage, including protective sheets around the decking.

Is this a fence replacement or a painting job?

This gallery shows repainting of the existing photographed timber boundary and screen. Lighter panels appear in the starting views, but these photographs do not establish that our team installed them. Repairs and replacement are assessed and quoted separately when needed.

Why use a professional to paint a garden fence?

A professional can assess the timber and old coating, plan appropriate preparation, protect adjacent surfaces and agree a suitable exterior coating. Long boundaries, gates, restricted access and drying conditions all affect the work beyond the visible colour change.

Can you paint straight over green or weathered timber?

The surface needs assessment and suitable preparation before coating. Growth, loose material and moisture can affect the result. Preparation and drying should follow the selected coating’s instructions, and any damaged timber should be assessed before painting.

How do you protect decking beside a fence?

The photographs show sheets beneath the deck-side working areas. For a new job, we agree appropriate protection around the timber, including nearby decking, paving, masonry and planting. Protection needs checking and repositioning as the work progresses.

How many coats were applied on this job?

The photographs do not confirm a coat count or exact coating specification. For your project, we agree the product and application requirements after assessing the timber and previous finish.

Are these final handover photographs?

Several later photographs still show protective sheets and coating materials. We have labelled them as coating-stage views so you can judge the colour change without mistaking them for a final cleared handover.

How can I get a fence painting quote?

Send photographs of the whole fence, close-ups of its condition, your postcode and which faces, gates or screens you want included. Our team confirms the scope and price, and will explain if a visit is needed before quoting.

Request a quote

Ready for a sharper, better maintained property?

Fill in the quick form and we'll come back with a clear next step. Prefer to talk? Message us on WhatsApp or call 07539 426062.

Prefer a landline? Office 01244 840444

Or email Email our team

Tell us what needs doing

Choose a service, leave the key details and we'll come back with the next step.

Rather not type all that? — it takes the details and books your free callback.

Optional AI starting estimate Get a guide from the visible details in your photo. Our team confirms the scope and price; any preview is illustrative.

AI estimate

What happens next

  1. 1Send photos or a quick description of the job
  2. 2We review it and reply with a clear next step
  3. 3We agree the work, price and available dates before booking
Fully insuredClear next steps